


Photography Tips

SVW Photographic guidelines / tips / suggestions


Steve Balsbaugh, Jim Gott & Chinniah Poosapadi
September 4, 2020
With so many of us “sheltering in place”, taking photos of our woodturnings has become the primary means of sharing. This is generally via Zoom meetings and emails. In addition, there are newsletter needs, and a photo gallery is being setup for use by SVW members.
Woodturners should not feel like they must become professional photographers before they share their work. The cameras used can vary from cell phones, which produce excellent images to professional DSLR cameras and accessories.
These guidelines should help with whatever level of effort you choose to apply to your photo images.
Cell phone settings / usage

Most cell phones determine the settings for you. Recent versions allow the user more creative control. When you do have the capability, select a f-stop with the highest number, such as f/8 – f/16. This will give you the most depth of field.
Because the default focal length for a phone camera is on the wide-angle side, getting the phone close enough to fill the frame in normal mode may distort the image and change the apparent shape of the piece. Cell phone users should consider standing back a little and using the telephoto lens (if their phone has one) or zoom in with their fingers to fill the frame with their turning.
For more advanced cameras, key settings are:
-
Aperture - You want as much depth of field as possible (as much of your object in sharp focus as possible). This means the highest f-stop number available, such as f/16 - f/22. Depending on the lens used, smaller apertures (higher f-stop numbers) can affect image quality (distortion).
-
Shutter speed – The key thing is to avoid camera shake while taking the photo. A tripod is always recommended, if available. Using a cable release or delayed shutter trigger before the photos are taken is recommended. For handheld shots, a 1/640 sec or faster time is recommended. If shooting on a tripod, turn the image stabilization off.
-
ISO – Higher ISO numbers mean more undesired noise in the image. But you also need to have enough lighting for a quality shot. This requires coordinated aperture, time and ISO settings to create quality lighting. Select the lowest ISO that also allows you to meet aperture / shutter speed needs.
DSLR Camera settings
General preparation
If you have an air compressor, use it to remove any dust on your artwork.
Background

A neutral gray or solid white background works best. Craft paper, thin mat board, plastic sheets or cloth work well. Select material that is flexible enough to curve without creasing. Sheet size should be 28” x 22” or larger. Select a background color that yields good contrast to the object being photographed. Avoid background patterned material or objects that detract the viewer’s focus on your artwork.
Select a background texture that minimizes reflection. Attach the background to a small easel, box or chair, and allow it to curve into the flat surface. Place the object on the flat background material. This produces the same background below and behind the object being photographed.
Natural lighting is the preferred choice. Light from a north facing window on an overcast day is the ideal. You want as large and diffused a light source as possible. Any shadows will be less pronounced under these conditions.
A light box (tent style) also works well. The object is inside the light box and lights passes thru a white silk type fabric producing diffused lighting. This allows you more control of the light source. Having the light sources placed higher than the light box via variable height stands works best.
You want the photo exposure to showcase the wood grain, but not produce “hot spots” that overpower the wood texture. Small highlighted areas on the object, add to the image. Having the light source at about a 20-degree angle to the camera will offset any highlighted area from the center of the object.
A diffuser (limits the amount of light passing onto the targeted area) can also be used to control the size/intensity of the highlighted area.
Recognize that the finish used on your object will factor into lighting requirements. Satin finish reflects less light.
Lighting

Image shape / size

The most common digital sensors have a 2 to 3 pixel count ratio. Photos submitted in 2x3, 3x2 or 1x1 ratios are highly recommended and work best with web pages.
1920 pixels wide and 1080 pixels in height will provide the best resolution. Larger sizes will just slowdown the file transfer process. Make square (1x1) images 1080 pixels on all sides. Portrait mode photos should be 1080 pixels in height.
You want to have as much of your woodturning in sharp focus as possible. How much of the object is in sharp focus depends upon your placement of the focus point from the camera on the object and the aperture setting, which controls how much of the image is in focus. The smallest aperture setting (largest f stop number, such as f/22) gives you the most depth of field.
Use the single focus point setting on the camera, if available. Place this focus point 1/3 of the way from the nearest point of your object to the farthest visible point. One method is to locate the widest diameter on your turning and then locate a spot 1/3 of the way around the diameter to obtain the placement for your single point focus. Depending on the shape of your turning, this may be on or near the front rim.
For more complex objects or multiple objects in a single image, determine where you wish to draw the viewers’ attention towards. For natural edged bowls, the bark might be your starting point of choice.
Focus point

Composition
The eye is normally drawn to the lighter areas in a photo and centrally located.
A 15° - 20° downward slope of the camera is a good starting point. It creates a focus on the front surface of the bowl and provides access to viewing some of the inside area. The higher the camera angle, the more inside of the bowl is shown. That may be what the photo creator wishes to emphasize.
Give your artwork some space around the edges of the photo. Do not feel like you need to make your object as large as possible.
For photos shown over Zoom, having the object fill as much space as possible inside the photo may be more beneficial to the viewer.
Cropping should be completed prior to submittal.
Photos should be submitted in .jpeg format. Dropbox is the default application used for submission if you have the skills and application to do so. Otherwise check with the contact person for assistance / agreement on an alternative.
Submittal

Photographic software

Additional software, such as Adobe Lightroom / Photoshop, can be valuable. Exposure can be optimized, and shadows reduced. Hot spots, cropping, lens dust, etc. can also be improved. There are other s/w products available, including free applications, for your consideration.
Setting up to take photos

The grey plastic background is resting on an easel in a smooth curved manner. White reflective paper is available to provide supporting light. There is a north facing window directly behind the tripod. Two LED lights on stands are available, primarily for use with a photo tent setup.
The photo light box causes the light from the LEDs to be diffused on the object and minimize harsh hot spots. Some LED lights allow you to dial in the desired color temperature. The camera is attached to the tripod in front of the light box.


Photo/object created by Stephen Balsbaugh
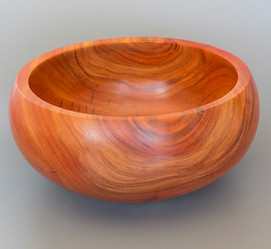
Natural light from directly behind the camera is used for this photo. A white semitransparent umbrella was used to diffuse the light source. Camera settings: 1/6 sec, f/22, ISO 3200. Focus point was on the front lip of the bowl. Note how the shadow below the bowl has been softened by the natural light. Camera angle is 22 degree downward from the camera.
While I don’t notice any camera noise, I would recommend using a lower ISO setting and longer exposure. Placing the single point focus 1/3 of the way around the widest diameter of the bowl would have provided more of the bowl being in sharp focus.
Contrasting this with the previous photo, the camera angle is now 25 degrees, showing more of the inside of the bowl.
How much of the inside of your artwork you wish to show will be driven by the object shape and what you wish to highlight in your image.

Photo/object created by Stephen Balsbaugh

Camera settings: 0.4 sec, f/16, ISO 200. Photo was taken inside the box tent with two external lights placed higher than the object. The focus point was the front rim (bark area), which I wished to emphasize.
Photo/object created by Stephen Balsbaugh
Steve Balsbaugh
You can see some of Steve's work in his member gallery.
You can see some of Jim's work in his member gallery.
A .pdf version of these photography tips is available here.
Source for Adobe photo editing software.
Source for photography lighting equipment, reflectors etc.
You might also be interested in looking at Mike Lanahan's September 2020 presentation called How to get the most from your Digital Photos. Mike had given a similar presentation to the club in September of 2012.
